|
Placing a heating system on cars is as important as adding up an air-conditioner, especially in chilly weather. As a result, RV heating costs cheaper than on cold seasons than in normal days.
Here are the different types of heating systems for RVs: 
Four Common Types of RV Heating System
Which of the four heating systems can keep your van warm – portable heaters, reverse-cycle air-conditioning, or gas or diesel heater? Portable heaters and air-cons demand extra work to get started. On the other hand, gas and diesel heaters are stand-alone systems to heat up RV interiors. Keep an eye on each type’s advantages and disadvantages to easily select which one is better. The sure thing is, no one is better than the other as the choice depends on your needs. 

Reverse-Cycle Air-Conditioning
This option is a versatile way to keep your RV cool and dry at the same time. Most reverse-cycle air-conditioning is placed on the ceiling of a full-sized van. The installation process has all the accessories needed to be made available from the factory, like H-frame support. It can also be an all-round air-condition by its roof-top installation. However, you should be extra careful with its pop-top design. The air-con unit has a harmful roof lifting mechanism that won’t lift extra weight during installation. Installing the unit with layout permitting, under a bed, or under seats could be an alternative. Allow extra space for route ducting and heated-air outlets. One good thing with reverse-cycle air-conditioning is it can provide warmth overnight. Just set the temperature to your desired heat level and be ready to go. The air might become too dry that will cause irritation. Now, here are the downsides of air-conditioning you should be aware of: ● Delivering heat in an RV starts after a few minutes, which is not ideal for most campers. Also, it is only compatible with 240v AC power. ● Running the system can be noisy. ● The need for a licensed electrician adds up the cost of installing the air-con unit. ● You must look for a powered site before going on a trip to make use of the reverse-cycle air-conditioning. ● A lithium power system is an expensive alternative to a power grid, hence adds up cost. ● Using a generator is another option, but then again very costly. An air-con unit requires a 2.4kVa generator that may cost 2000 dollars. ● It brings so much inconvenience for the campers. As campers want to make things work faster, reverse-cycle air-conditioning is not ideal to break that chilly morning.
Gas Heater
Gas heaters are the best choice for heating large spaces since they operate quietly compared to other heating units. To run the system, a 12V power must exist. It makes the fan and control unit function so well to create heat in your RV. Clean fuel is suitable for running the gas heater, which is accessible at home. Gas heaters are both electricity and fuel-efficient in order to deliver heat in two weeks. Only a 9-kilogram bottle of clean fuel can last for weeks while drawing a low current. Remote areas charge higher costs in refilling the gas bottle than in cities. One is found in Australia’s Truma Vario Heat Eco, formerly Truma system. A gas heater must be installed by a licensed gas fitter to avoid leaks on the gas line. They follow regulations to safely fix the heating system to some RVs. Do not install a gas heater near the door, window, and other gas appliances for safety purposes. 
Diesel Heater
The final caravan heater option is perfect for DIYers, with no need for licensed fitters. It is an efficient heating unit with a compact design. Diesel heaters work with 12V power and the same fuel for tow vehicles. Proper installation will result in a quieter operation, as diesel heaters can be loud sometimes. Inlet silencer or exhaust muffler helps to reduce the noise of the pump, much better when it is insulated. Having an extra diesel fuel during trips is advisable, together with a jerry in topping up the heater. Compared to gas fuel, diesel smells worse and can easily stain stuff. Heating performance may also be reduced by carbon deposits formed in the chamber. Running the system in the full heat of at least an hour helps to burn the deposits. Make sure the heater is set on high for long periods. Periodic maintenance is necessary to enhance the features of the diesel heater. It includes cleaning the glow pin to remove the carbon deposits stuck in the chamber. In addition, replace the fuel filter and perform checkups on the exhaust lines at least two years in a row. Which Should I Choose? Choosing the best air conditioning for caravans is crucial to match your trip essential on an RV. Better pick the system that fits your caravan needs as well as your budget. There are a lot of options you can find, so make sure to select the ones that passed quality standards.
5 Comments
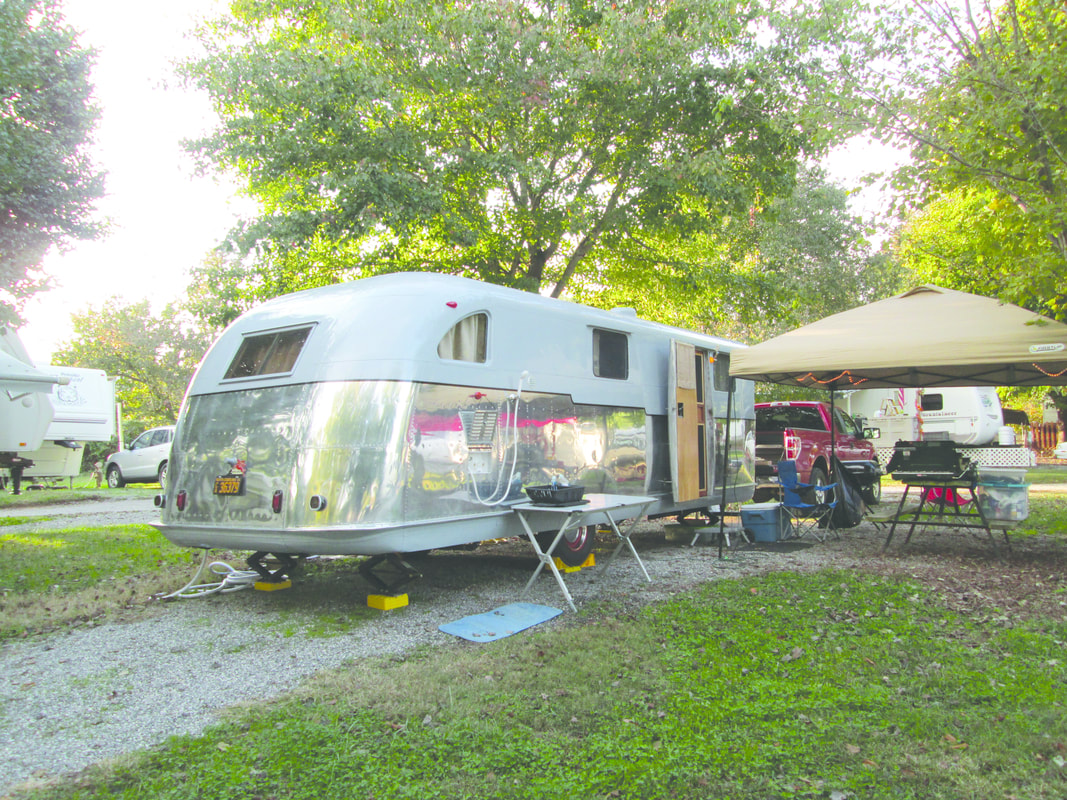
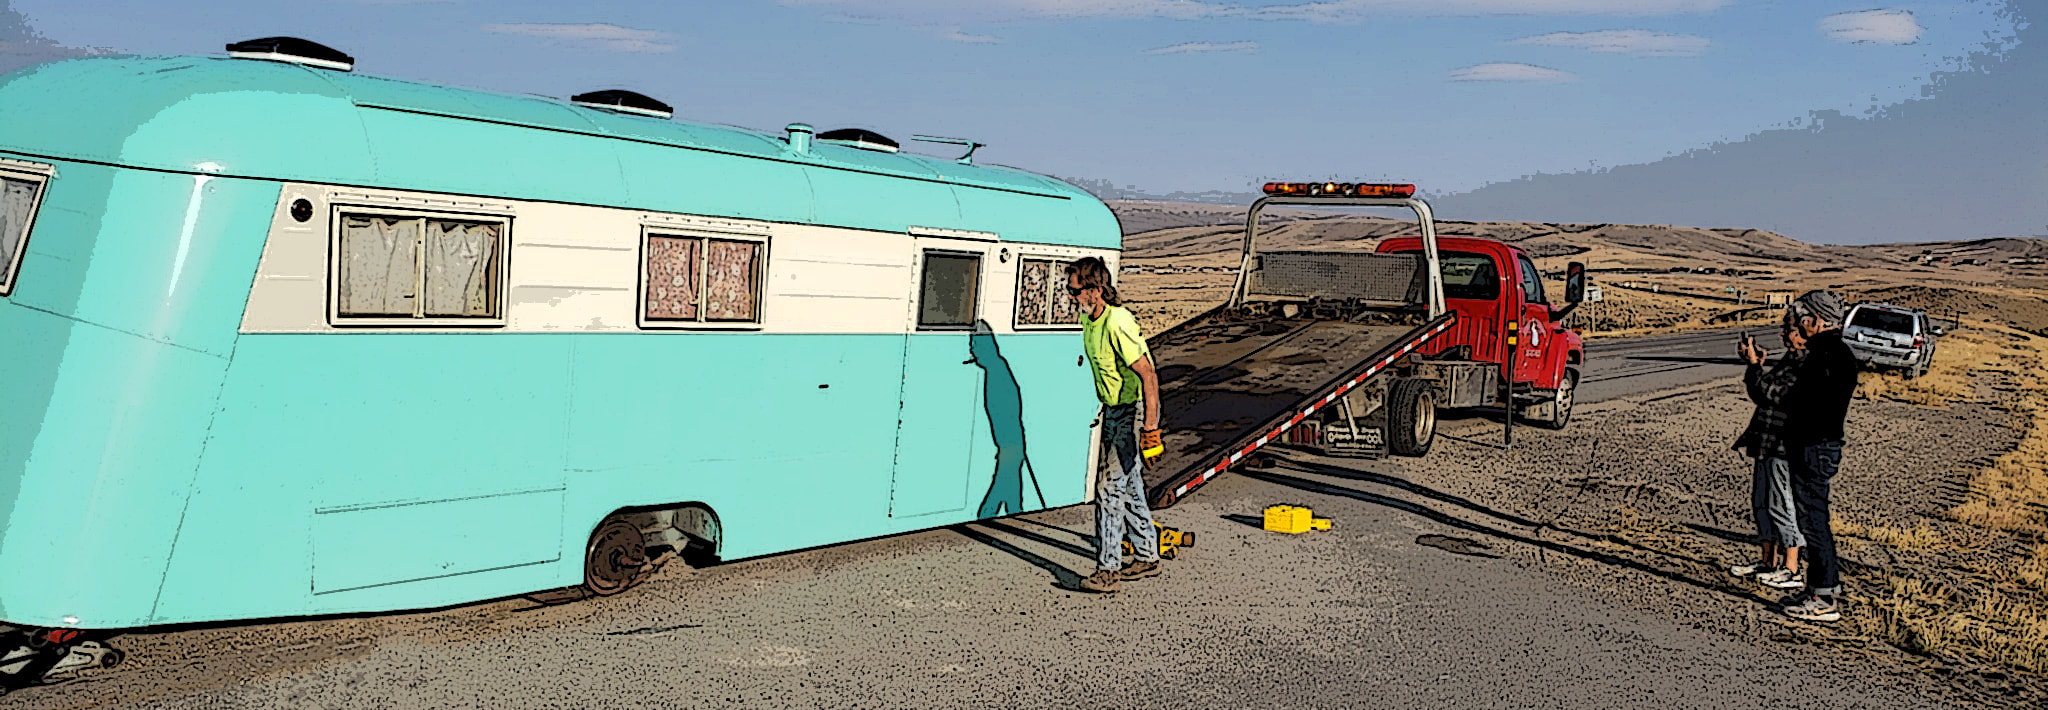 This unfortunate roadside occurrence was shared in the Vintage Camper Trailers Facebook groups page. If it is time to replace the old tires on your vintage trailer, you may have a hard time matching up the numbers with the new tires sold today. We rely on Tire Rack to help us figure it out when we need new rubber. Here are some guidelines you can use to replace your old tires before you are left stranded on the side of the road.  Click on the chart above to download a pdf. Depending on the sizing system used when the tire was manufactured, there may not be a good rule of thumb or step-by-step process to follow to make the conversion. The chart above has many of the different sizes you may encounter. For something like a 6.50R15, the 6.50 indicates the nominal section width of the tire in inches, and the 15 is the wheel diameter, also in inches. Since modern tire sizing typically uses millimeters for the section width, we need to convert 6.50 inches to millimeters, so 6.50 x 25.4 = approximately 165mm. When the aspect ratio is not listed, like in 6.50R15, it is assumed to be 82, meaning the sidewall height is 82% of the tire's section width. Modern tires use aspect ratios in increments of 5, so the closest current size to a 6.50R15 is 165/80R15. The conversion is very much an approximation, not an exact science. If your travel trailer has a tight fitment without much room for variance in tire size, it would be best to take some measurements and give us a call before pulling the trigger so we can help ensure you get a tire that fits.   In issue #52 of the Vintage Camper Trailers Magazine, we will also cover when to replace your tires and how to read the dates on tires, why you need trailer tires instead of passenger car tires, how to determine load ranges, and whether or not to balance your trailer tires. Don't miss it. Subscribe today.
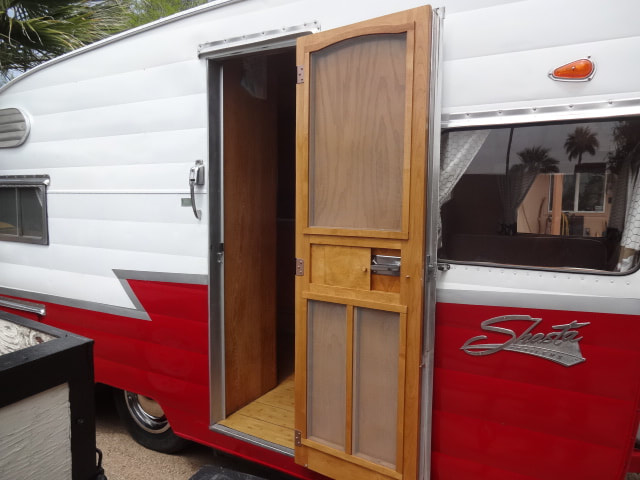
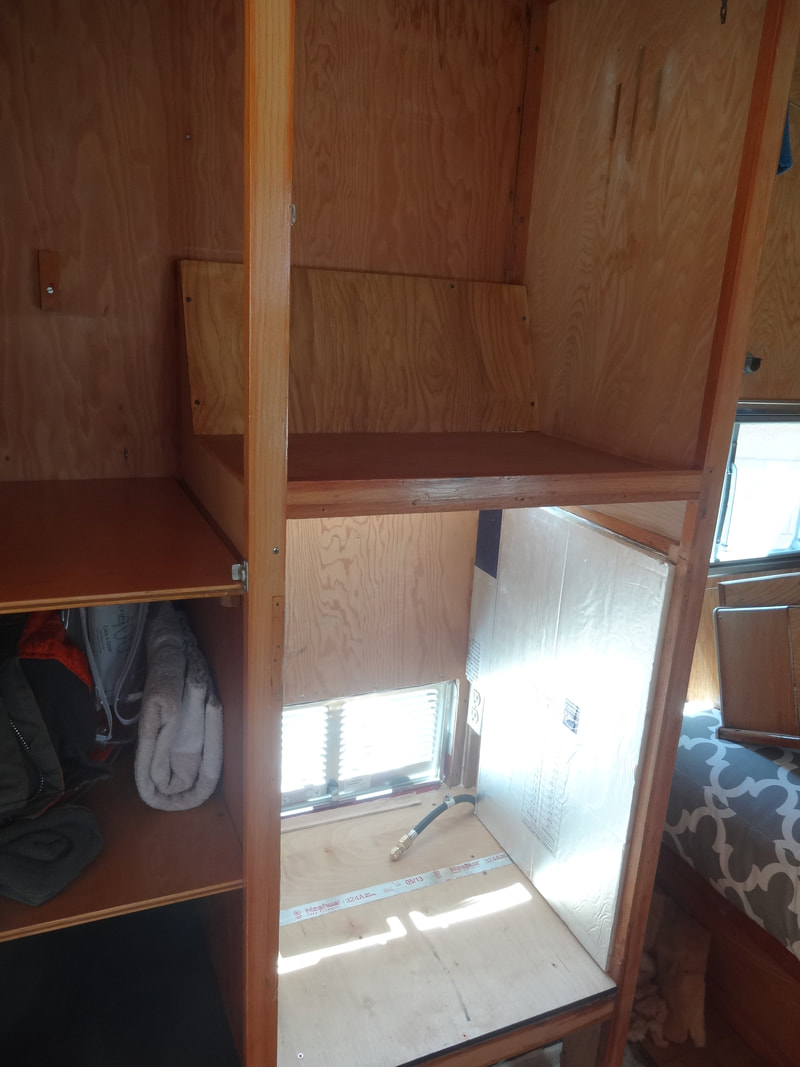
April 17, 2020 Started project by removing door, screen door, and both jambs from the trailer. This was necesary in order to remove the existing ice box from the trailer and to get the new lp/ac refrigerator into the trailer as neither one would fit through the door opening with doors and jambs in place. Did some preliminary demo of the opening that housed the old ice box. These steps took approximately 4 1/2 hours.
April 22, 2020 Installed 2 1" pvc conudits under the trailer in order to get the gas supply and electrical wire to the side of trailer where the fridge will be placed. Also today ran the 12-2 romex in the new conduit. Need to order my gas supply line as I now have a good idea how long it needs to be. Worked about 5.5 hours today
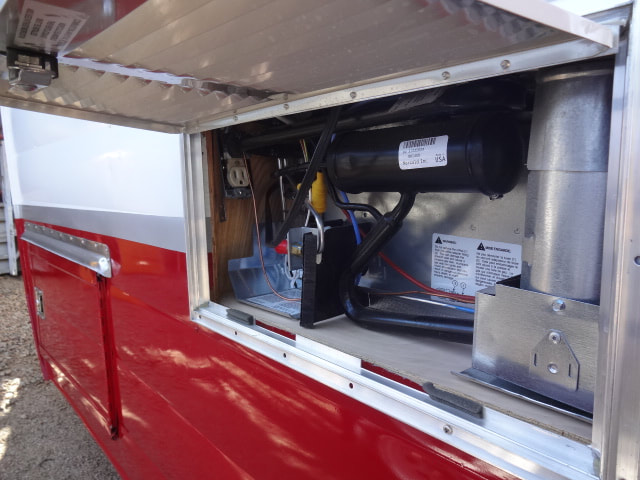
April 25, 2020 Today the electrical tie-in was done at the main panel, with a loop to an outlet behind the stove. 12 ga. wire was used per Norcolds recommendations. Also cut in the lower fresh air/access panel, which allowed me to locate the electrical outlet which will service the fridge; and get an idea as to where the gas supply will be placed. It's a tight fit but do-able. Thankfully the Shasta side vertical framing members are placed exactly where needed for the lower and upper intake/exhaust vents! Just had to add 1 horizontal framing member for the bottom vent, but the top will require 2 horizontals, which will be held in place with screws through the 1/4 " plywood from the inside. Worked about 6 hours today April 27, 2020 The gas hose to extend gas supply to the new fridge arrived from Amazon today. Routed it from tie-in behind stove to new fridge, installed a temporary cap at fridge end so I could double, triple check for leaks behind stove before it is bolted back in place; (left the gas on so tomorrow I can quadruple check for leaks before the stove goes back in place). Also today, completed electical installation at new outlet location for new fridge. Checked for proper voltage (120v), which I have; sweet! Finally finished today with locating and cutting in the rough opening for the upper side vent. It's easy to write all these jobs down, however, I worked on this about 7 hours today.
April 29, 2020 Finished framing in upper vent rough opening and pre-drilled mounting holes for exterior vent cover. Removed floor and gave top and bottom a coat of sealer. Installed some extra sheilding for gas supply line where it enters the trailer floor at both locations. Started fabricating the upper fridge enclosure panels. Worked about 5 hours today. April 30, 2020 Completed the upper enclosure shelf and baffle (which directs hot air out to the upper vent), and stained the interior side to match the ash Shasta paneling. Installed 1" rigid foil faced insul-board on either side of the enclosure which closes the gaps on the fridge sides (Norcold recommends less than 1/2 inch clearance for both sides); I wound up with about as close to zero clearance as possible. Using urethane sealant I also seals the floor penetrations where the gas/electric was routed. Worked about 3 1/2 hours today.
May 1, 2020
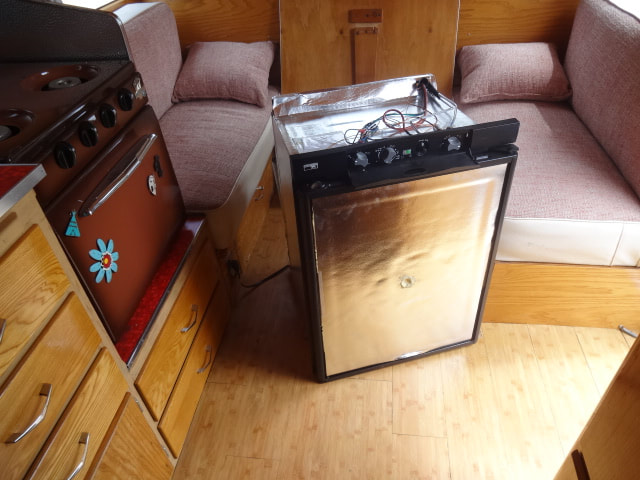
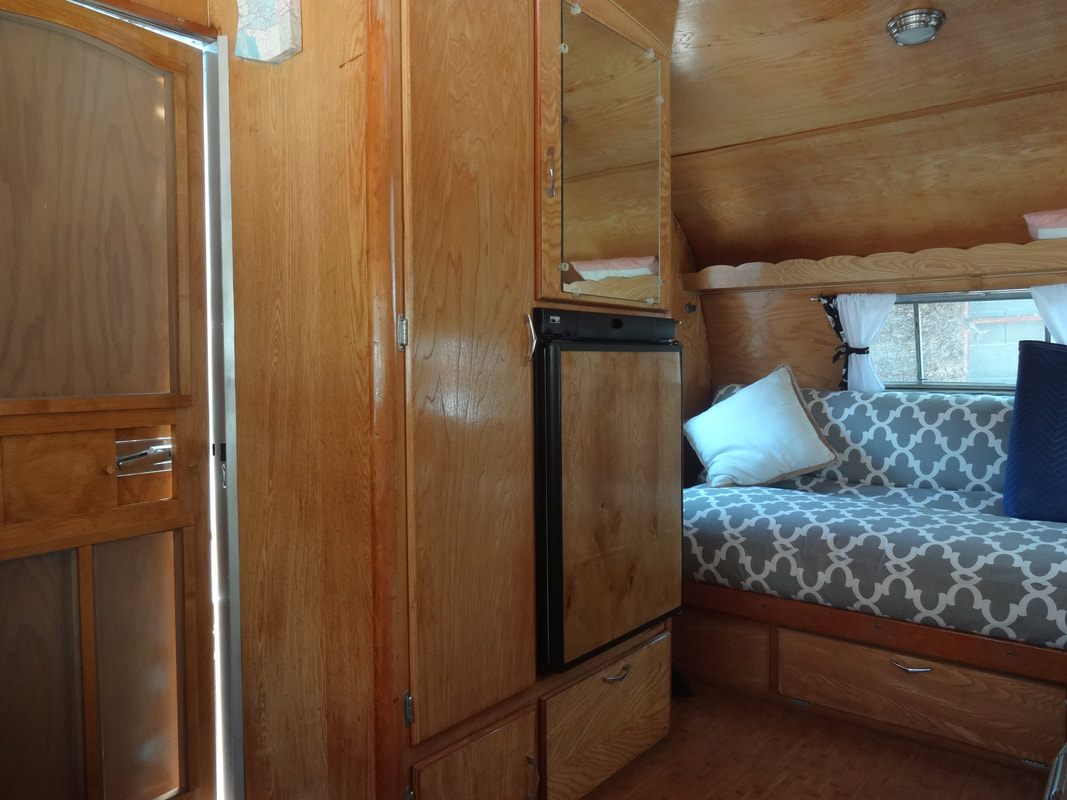
Finally! Ready to slide the fridge in for the last time, and it was a perfect fit! Hooked up the gas supply, checked and triple checked for leaks then lit the fridge on propane for the first time, ( we had already tested the AC side prior to this). After about 3 hours the fridge started to cool; filled the ice cube tray and checked after another 3 hours to find ice starting to form, walked away from it for today; checked early the next morning to find solid cubes in the tray. I plan on running the fridge on propane for 3-4 days to get a feel for how much gas is being used.* Remaining tasks include deciding on a door panel insert, matching the paneling or brushed aluminum/stainless?? Securing the fridge to the enclosure/floor with provided screws. Will also need to modify the storage door/mirror above the fridge as it encroached about 3 inches into that existing space. This should be a nice upgrade to make camping just that much more enjoyable. Stained/varnished fridge panel in place (turned out a little darker as a different species of plywood was used, but it will do for now).(painting vents, fridge door panel, and modifying upper cabinet door/mirror: about 6 hours) * ran the fridge on gas from a hot start-up for 5 + days in 100 degree heat and it used about 3.5 gal. propane. It should do better if I pre-cool first using 110 v, then switch to gas before travelling.  What can you do to ensure that your vintage trailer doesn’t get that funky musty smell? Mold and mildew can make your trailer stink and do damage to the soft surfaces inside your RV. The musty smell when you walk into the RV is an indication that there are damp areas where mold could be growing. A dehumidifier in your RV when it is stored for extended periods of time will prevent the build-up of moisture. Mold can occur during winter as windows are closed and the surface of walls and windows become colder because the outside air temperature is lower. Simply opening a window is not a solution in the winter months, this is where a dehumidifier comes in. It will reduce the level of humidity in the air by sucking in air from the room at one end, removing the moisture, and then blowing dehumidified air back out into the room again.  Many RV owners find that compressor dehumidifiers would not work well at temperatures below 60 degrees Fahrenheit, and there were often problems with the compressor dehumidifier machines icing up. These dehumidifiers address these issues, functioning consistently well at all temperatures. You can also attract and remove moisture from the air with a scented moisture absorber. For $10-$30 you can protect your vintage trailer from moisture damage while you eliminate musty odors. Excess moisture is absorbed into the white calcium chloride crystals. The white crystals begin to harden and form a solid mass. Hardened crystals must be discarded and re-purchased as they are used. Another trick is to place open containers of coffee (a cup or so) in your cabinets. The coffee grounds can help neutralize any odors that you may already have. Courtesy of the Vintage Camper Trailers Magazine 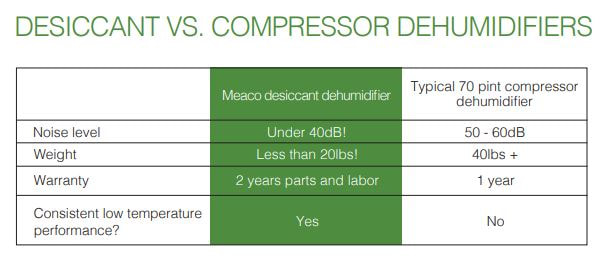    How fun would it be to work with vintage trailers every day? The vintage trailering hobby only seems to be growing. Vintage trailers appeal to so many people for so many different reasons. Restoring them for rallies, rentals and mobile vendors are just a few of the ways vintage trailers are being used. If you are knowledgeable with all areas of RV repair/restoration and have experience managing other workers, this may be the opportunity you have been looking for. Vintage Campers is a full-service vintage camper and vintage trailer dealer specializing in SPARTAN and other riveted trailers. They mainly deal in trailers from the 40s’, 50s’ and 60s’ with riveted construction because they are more durable trailers and will last a lifetime. Offering vintage trailer sales, restoration services (major and minor), as well as, new, salvaged and reproduction vintage trailer parts, Vintage Campers is a respected go-to in among trailer restorers and a longtime supporter/advertiser in the Vintage Camper Trailers Magazine. Other trailers in their stock include Airstreams, Avions, Silver Streaks, Boles Aeros, Vagabonds, Curtis Wrights, Streamlines and others. Wood framed vintage campers like Shastas, Scottys, Yellowstones, Fans, Trotwoods and Palace trailers also find their way in to Vintage Campers yard. Centrally located in the Midwest in the small town of Peru, Indiana. Whether you are applying for a position or looking for your next vintage trailer, Dan and his crew are there to serve you with the honesty and integrity that you deserve. Thanks for visiting VintageCampers.com. They hope to hear from you soon. Email your resume: dan@vintagecampers.com |
THE VINTAGE CAMPER TRAILERS MAGAZINE BLOG


Categories
All


This site contains affiliate links to products. We may receive a commission for purchases made through these links.
Archives
April 2024
This site contains affiliate links to products. We may receive a commission for purchases made through these links.
|


 RSS Feed